I have an external device for hosting my certificate!
Yellowfin can be configured to use SSL/TLS to encrypt its connections. Furthermore, we can force Yellowfin to use HTTPS and disallow any unencrypted sessions to the application server. Note that this does not encrypt traffic between Yellowfin and your data sources.
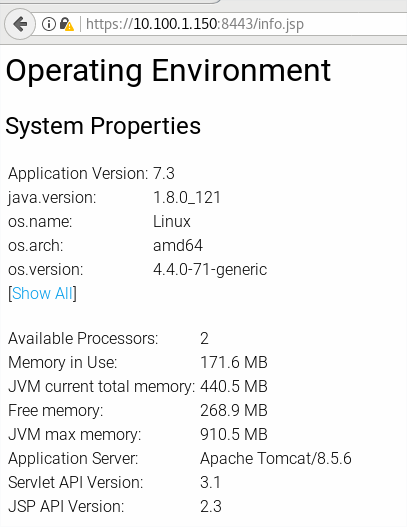
You can view detailed information on configuring SSL/TLS on Tomcat via their website. Keep in mind your Application version when researching this, as each version of Tomcat looks a little different. If you're unsure, visit the info.jsp page of your Yellowfin Server by adding /info.jsp to the end of your login URL. Your Apache version will be the value of "Application Server."

The differences in the configuration files aren't extreme, so I'll use Tomcat 8.5 as my example in this article. This page has detailed information on different types of SSL/TLS configurations for this version.
The method outlined here will employ a self-signed certificate to force HTTPS to our Yellowfin Server. It is possible to use signed certificates in your production environments to prevent error messages in the browser.
The Keystore and Certificate
I have my own signed certificate!
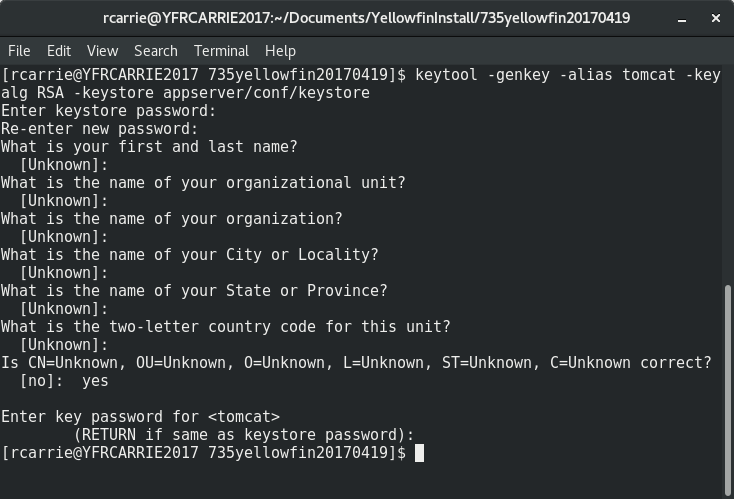
The first thing we"ll need to do is generate the Java keystore, where we will store the certificate used to encrypt the user sessions. You'll want to run the following in your command line (Note that YellowfinInstall will indicate the location of my Yellowfin Installation folder):
keytool -genkey -alias tomcat -keyalg RSA -keystore /YellowfinInstall/appserver/conf/keystore
If the keytool command isn't found, you'll find it in $JAVA_HOME/bin/. You'll be asked to specify a password here. For the purpose of this tutorial, we'll use "changeit" for our password. I recommend something a little harder to crack for production environments.
This command generates a keystore using the RSA algorithm into the appserver/conf/ folder of my Yellowfin installation. Note that you can elect any other file path as long as the user you're generating the keystore as has write access to the path. You"ll also want to ensure the user Yellowfin runs under has read access to your keystore.

The additional questions can either be filled out or skipped. When asked to verify the information, type yes. In my example, I used the same key password for the self-signed cert (tomcat) as I did for the keystore. Feel free to make these different and as complex as you desire.
Now your keystore is generated and you have placed a self-signed cert within it!
If you're wanting to use a signed certificate, you could now create the Certificate Signing Request and import your certificate. More details are available on that here.
Next, we want to make sure that our certificate is trusted by Java. To do this, use the Keytool utility’s -export option to export the certificate from the keystore to a separate certificate file, from which you can then import it into your application’s trust store. For example, the following command exports the certificate shown above, whose alias is tomcat, from the key store (selfsigned.jks) to a certificate file named selfsigned.cer:
keytool -export -keystore keystore -storepass <password> -alias tomcat -file selfsigned.cer
Import the certificate into the Java trust store. The Keytool utility’s -import option installs a certificate from a certificate file in a specified trust store.
Specifically we are looking for the cacerts file, which can be found inside of you Java Install directory. On most linux systems this will be in $JAVA_HOME/**java version**/lib/security/cacerts, the following command will install the certificate from the file selfsigned.cer created above (using /usr/lib/jvm/java-1.11.0-openjdk-amd64 as the specific $JAVA_HOME/**java version**/ for my test system):
sudo keytool -import -noprompt -trustcacerts -alias tomcat -file selfsigned.cer -keystore "/usr/lib/jvm/java-1.11.0-openjdk-amd64/lib/security/cacerts" -storepass changeit
The Connector
The next step we'll have to take is enabling the SSL/TLS Connector. Since this happens on a different port, we'll have to explicitly enable this port as a Connector within our configuration. Edit the
The first decision you'll have to make is which port to force your redirection to. There are some considerations here that are outside of the scope of this document. Keep in mind that to bind to a port under 1024 you will need to run the application as Admin / Root. The default redirect port is 8443.
If you're following along with Tomcat 8.5, the standard Connector starts on line 69.

You can see I've mapped standard YF connections to 7350. You want to make sure here that you have redirectPort="xxxx" where xxxx is the port you wish to map to. For this tutorial, I"ll use the default of 8443. As you can see, the redirectPort parameter is already part of my Connector.
Next, I'll add the Connector I'll use for my secured port. Starting at line 89, I replaced the commented out Connector block with:
    <Connector port="8443" protocol="org.apache.coyote.http11.Http11NioProtocol"
               maxThreads="150" SSLEnabled="true"
                scheme="https" secure="true"
                keystoreFile="conf/keystore" keystorePass="changeit"
                clientAuth="false" sslProtocol="TLS"/>
and uncommented the block. This tells Tomcat to listen on port 8443 and encrypt connections to that port using our keystore. At this point, if you don't want automatic redirection, you"re done! You can start Yellowfin and test this by visiting https://
Automatic Redirection
Automatic redirection will be configure in your
  <security-constraint>
    <web-resource-collection>
      <web-resource-name>Automatic SSL Forwarding</web-resource-name>
      <url-pattern>/*</url-pattern>
    </web-resource-collection>
    <user-data-constraint>
      <transport-guarantee>CONFIDENTIAL</transport-guarantee>
    </user-data-constraint>
  </security-constraint>
And you're done! Start (or restart) Yellowfin, visit your normal login URL, and you should be redirected to your encrypted Connector on port 8443 (at least in my case)!
Troubleshooting
If your Yellowfin doesn't seem to be coming up after making any of these changes, monitor your catalina.out log in your appserver/logs folder. Watch for a "SEVERE" tag. You'll see a file name and line number for where your error is, if it's a syntax error.

These logs show that I have a syntax error in my web.xml file at line 397, you can then use your google friend to identify and solve any issues that arise.
If you need further guidance Yellowfin can assist via our consulting channel, reach out to your CSM to get this organized.
